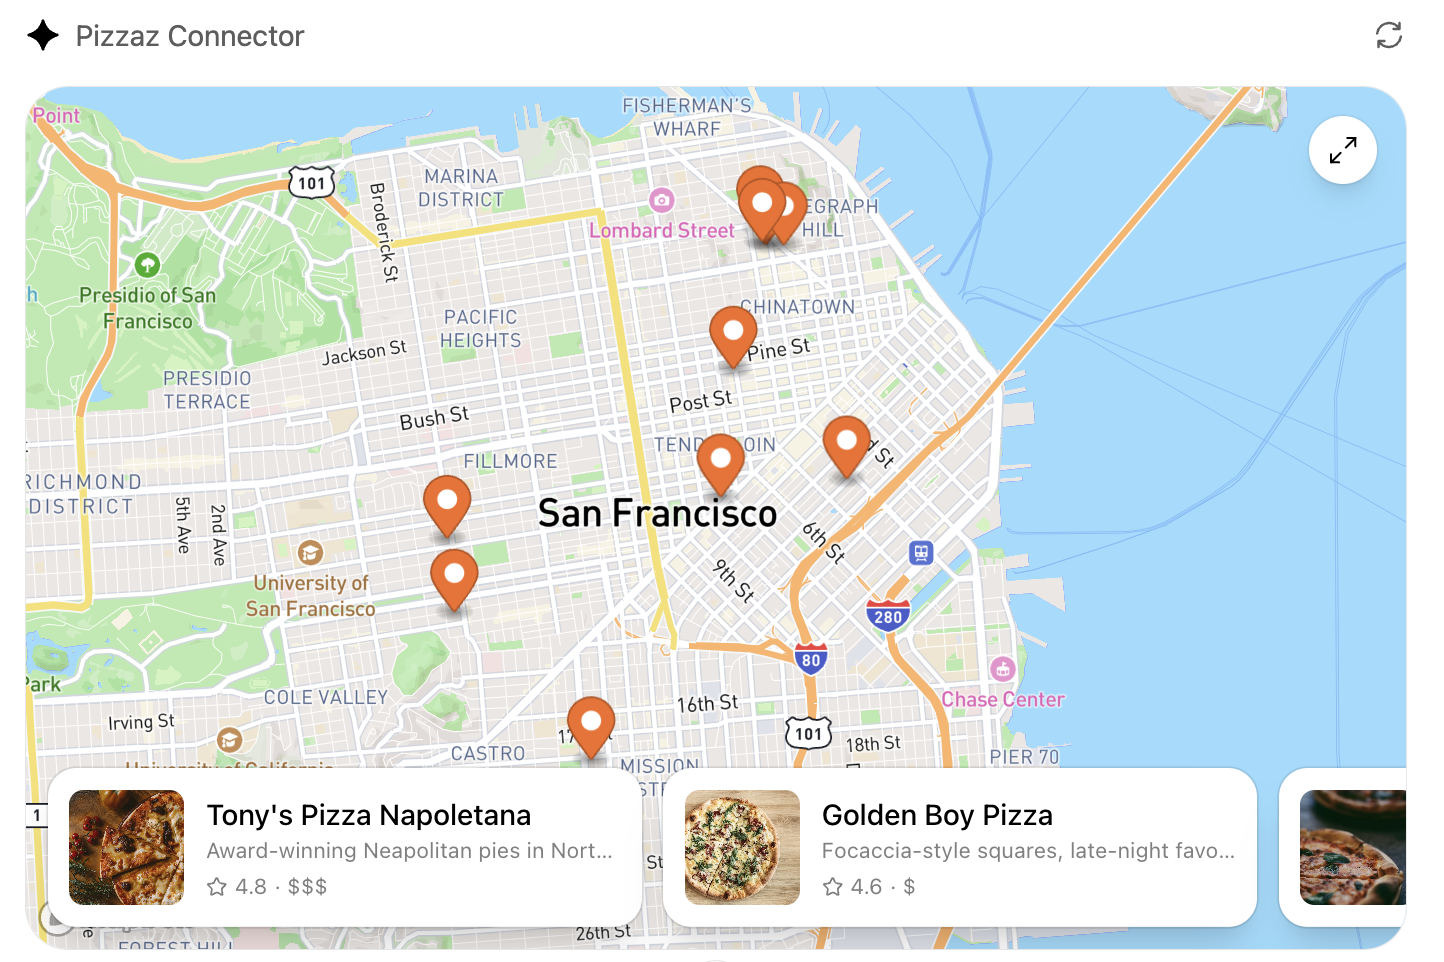
 *Screenshot: The Pizzaz map widget shows pizza spots on a Mapbox-powered map (integrated via the Apps SDK). When the “Show Pizza Map” tool is used, ChatGPT displays this interactive component in-line.*
Pizzaz also includes a **carousel widget** – a horizontal scrollable gallery of images of pizza spots. Invoking the `pizza-carousel` tool renders this UI. For example:
*Screenshot: The Pizzaz map widget shows pizza spots on a Mapbox-powered map (integrated via the Apps SDK). When the “Show Pizza Map” tool is used, ChatGPT displays this interactive component in-line.*
Pizzaz also includes a **carousel widget** – a horizontal scrollable gallery of images of pizza spots. Invoking the `pizza-carousel` tool renders this UI. For example:
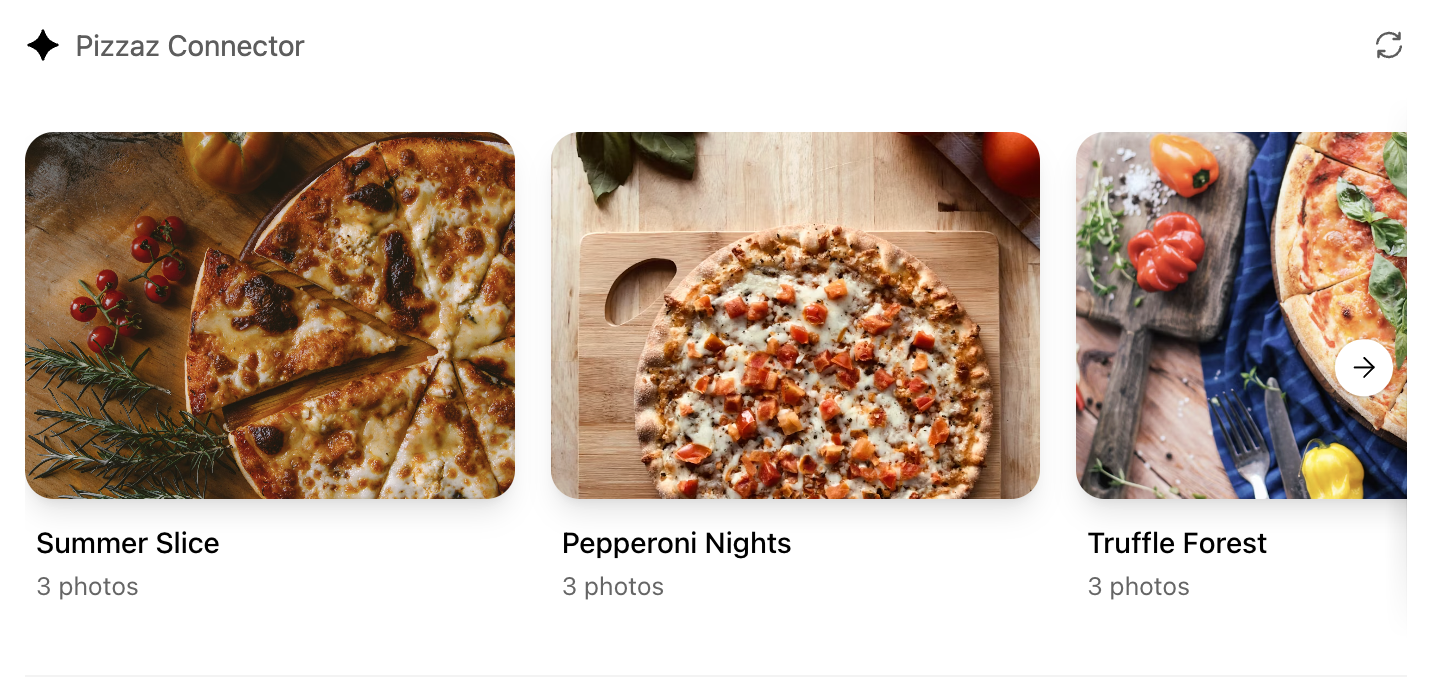 *Screenshot: The Pizzaz carousel widget displays a gallery of pizza restaurants (with navigation arrows). It’s rendered when the “Show Pizza Carousel” tool is called.*
Another example is the **list widget**, which shows a ranked list of pizzerias. When the `pizza-list` tool is used, ChatGPT shows something like this:
*Screenshot: The Pizzaz carousel widget displays a gallery of pizza restaurants (with navigation arrows). It’s rendered when the “Show Pizza Carousel” tool is called.*
Another example is the **list widget**, which shows a ranked list of pizzerias. When the `pizza-list` tool is used, ChatGPT shows something like this:
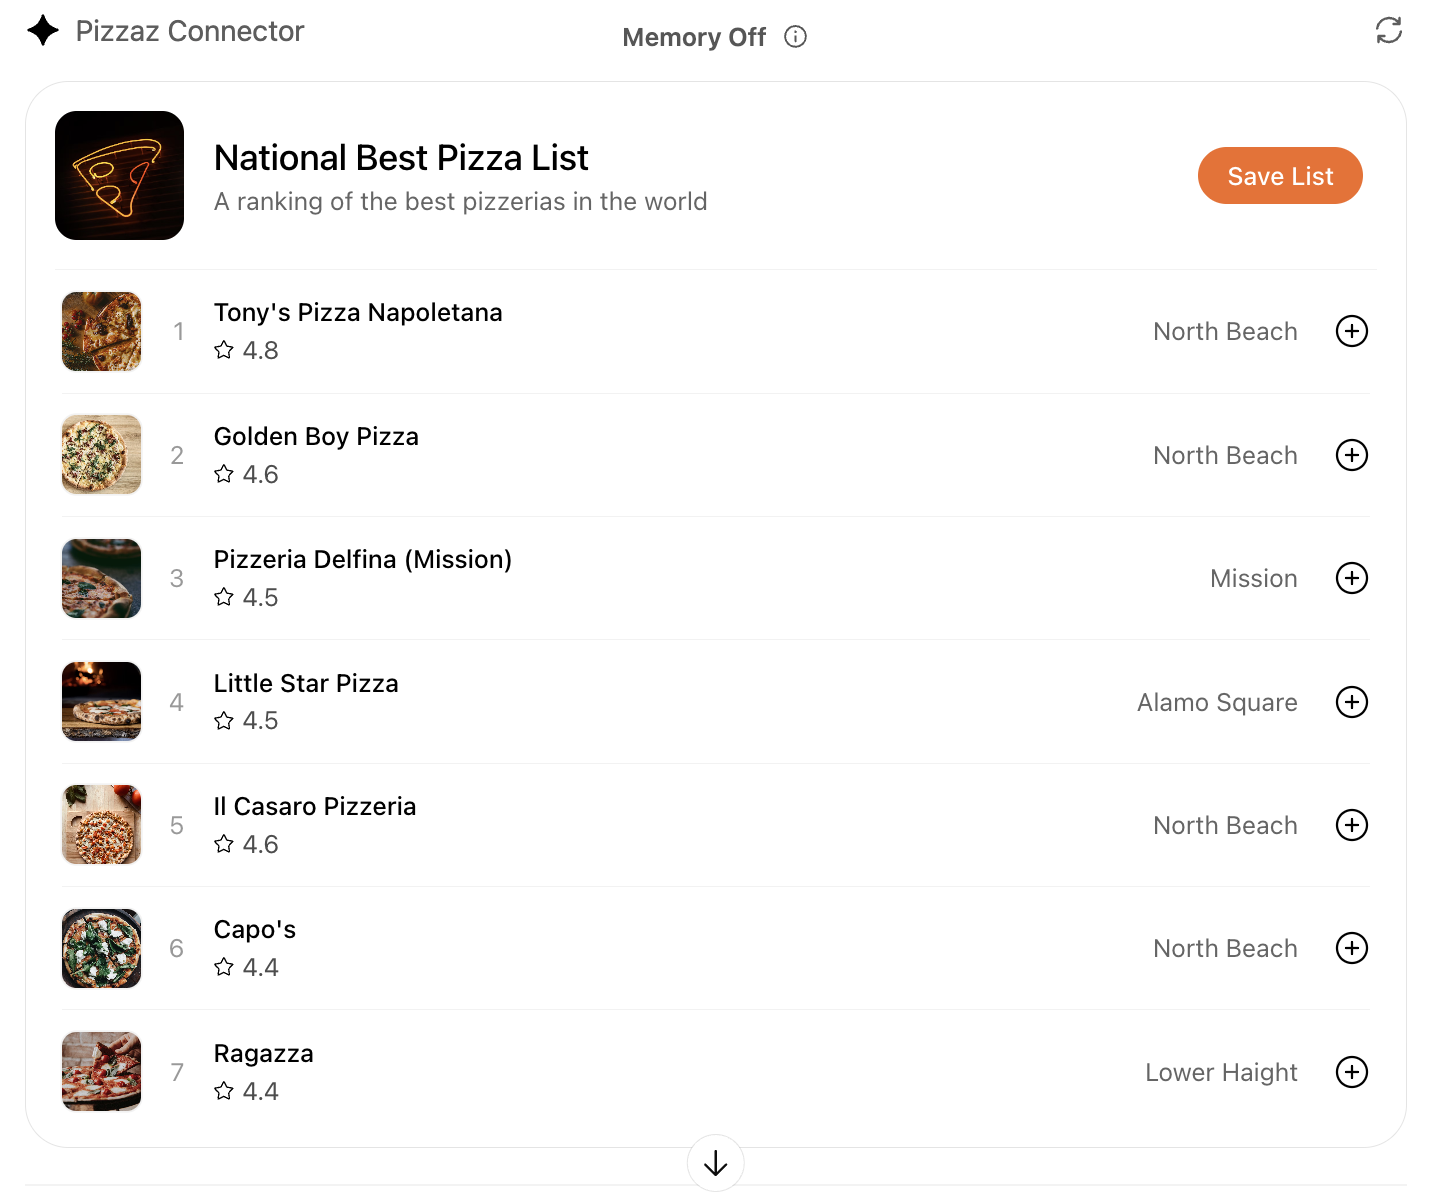 *Screenshot: The Pizzaz list widget, showing a top-7 pizza list with images, ratings, and save buttons. This component is registered by the MCP server and injected via the output template metadata.*
Each of these UI components is built with standard web tech (React, HTML, CSS, etc.) but is “wrapped” by the Apps SDK so ChatGPT can render them natively. The MCP server simply points to the prebuilt HTML/JS bundle for each component (from `assets/`), and ChatGPT takes care of displaying it.
### How It All Fits Together
When a user interacts with ChatGPT, the flow is: ChatGPT sees a user request, decides one of your tools matches the intent, and issues a `call_tool` via MCP. For example, user: *“Show me pizza shops near me.”* → model triggers `pizza-map`. The MCP server runs the corresponding handler (which could call external APIs or databases for real data) and returns content + metadata. Because we set `"openai/outputTemplate": "ui://widget/pizza-map.html"`, ChatGPT then renders the map widget with the (HTML+JS) we served. The chat continues with structured JSON available for the model to reference if needed.
In the Pizzaz Node code, most handlers are placeholders returning static text (“Rendered a pizza carousel!”). In a real app, you’d replace those with actual logic (e.g. call Yelp or Google Maps APIs). The beauty of the Apps SDK is you can mix *tools* (logic) with *components* (UI) seamlessly.
## Deploying the App
Once your MCP server is working locally, you can connect it to ChatGPT. In development, enable **Developer mode** in ChatGPT and use a tool like [ngrok](https://ngrok.com) to tunnel to your local server. For example:
```bash
ngrok http 8000
```
Ngrok will give you a public HTTPS URL (e.g. `https://abc123.ngrok.io/mcp`) that you can add as a custom connector in ChatGPT’s **Settings > Connectors**. ChatGPT will then send MCP requests to your local server through the tunnel.
For production, host your MCP server behind a stable HTTPS endpoint. Suitable platforms include cloud services like Fly.io, Render, Railway, or Google Cloud Run. Make sure your server’s `/mcp` endpoint supports streaming HTTP (needed for partial results) and proper status codes. With a public URL, simply add the connector in ChatGPT and your app is live.
## Tips: Expanding the App and Use Cases
After following this tutorial, you have a working ChatGPT app connector. Here are some ways to expand it or apply it:
- **Add real data sources:** Replace the placeholder handlers in `pizzaz_server_node/src` with real API calls. For example, fetch live restaurant data based on `pizzaTopping` or user’s location.
- **Build new tools:** Define additional tools in MCP for other features (e.g. an “order pizza” action, or a “suggest restaurants” tool). Each can have its own UI.
- **Create custom widgets:** Design your own React/HTML components and add them to the `src/` gallery. The build system will bundle them to `assets/` automatically.
- **Integrate Auth or Persistence:** Use Apps SDK’s support for OAuth 2.0 if you need user-specific data or login. Add state persistence (e.g. save favorites) by connecting a database.
- **Potential use cases:** Think beyond pizza! The same pattern works for any domain. For example, a travel planner could use a map widget for attractions, a list for itineraries, and tools to fetch flight/hotel info. A finance assistant might use graphs or tables as widgets.
- **Follow design guidelines:** Ensure your conversational flows feel natural in ChatGPT and follow the [official guidelines](https://platform.openai.com/docs/apps/guidelines) for UX and safety. Rich metadata (titles, descriptions) helps ChatGPT know when to launch your tool.
The key takeaway is that the OpenAI Apps SDK (with MCP) lets you **build AI apps with OpenAI** by defining tools + components. The Pizzaz Node example is a tutorial scaffold – use it as a template. Experiment with it, read the comments in the code, and adapt the architecture to your needs. For more details, refer to OpenAI’s documentation and the Apps SDK examples. Happy building!
**Sources:** The above tutorial references the official OpenAI Apps SDK and MCP documentation and examples. The Pizzaz example is from the OpenAI [Apps SDK Examples GitHub](https://github.com/openai/openai-apps-sdk-examples) repository. The embedded screenshots are from OpenAI’s Apps SDK docs.
---
# Integrating Next.js with OpenAI Apps: A Comprehensive Guide
Guide on integrating OpenAI Apps into a Next.js app. We cover how to set up an MCP server, define tools, and bundle React components for use as widgets.
**OpenAI Apps** turn ChatGPT into an “app platform” where third-party services can run inside conversations. Built on the open **Model Context Protocol (MCP)**, these apps let you combine chatbot prompts with rich, interactive UIs (widgets) powered by your own code. MCP is *“an open specification for connecting large language model clients to external tools, data, and user interfaces”*. In practice, this means you run an MCP server (in Node, Python, etc.) that advertises *tools* the model can call. Each tool can return structured data plus HTML/JS for a React component, and ChatGPT will automatically render that UI inline.
*Screenshot: The Pizzaz list widget, showing a top-7 pizza list with images, ratings, and save buttons. This component is registered by the MCP server and injected via the output template metadata.*
Each of these UI components is built with standard web tech (React, HTML, CSS, etc.) but is “wrapped” by the Apps SDK so ChatGPT can render them natively. The MCP server simply points to the prebuilt HTML/JS bundle for each component (from `assets/`), and ChatGPT takes care of displaying it.
### How It All Fits Together
When a user interacts with ChatGPT, the flow is: ChatGPT sees a user request, decides one of your tools matches the intent, and issues a `call_tool` via MCP. For example, user: *“Show me pizza shops near me.”* → model triggers `pizza-map`. The MCP server runs the corresponding handler (which could call external APIs or databases for real data) and returns content + metadata. Because we set `"openai/outputTemplate": "ui://widget/pizza-map.html"`, ChatGPT then renders the map widget with the (HTML+JS) we served. The chat continues with structured JSON available for the model to reference if needed.
In the Pizzaz Node code, most handlers are placeholders returning static text (“Rendered a pizza carousel!”). In a real app, you’d replace those with actual logic (e.g. call Yelp or Google Maps APIs). The beauty of the Apps SDK is you can mix *tools* (logic) with *components* (UI) seamlessly.
## Deploying the App
Once your MCP server is working locally, you can connect it to ChatGPT. In development, enable **Developer mode** in ChatGPT and use a tool like [ngrok](https://ngrok.com) to tunnel to your local server. For example:
```bash
ngrok http 8000
```
Ngrok will give you a public HTTPS URL (e.g. `https://abc123.ngrok.io/mcp`) that you can add as a custom connector in ChatGPT’s **Settings > Connectors**. ChatGPT will then send MCP requests to your local server through the tunnel.
For production, host your MCP server behind a stable HTTPS endpoint. Suitable platforms include cloud services like Fly.io, Render, Railway, or Google Cloud Run. Make sure your server’s `/mcp` endpoint supports streaming HTTP (needed for partial results) and proper status codes. With a public URL, simply add the connector in ChatGPT and your app is live.
## Tips: Expanding the App and Use Cases
After following this tutorial, you have a working ChatGPT app connector. Here are some ways to expand it or apply it:
- **Add real data sources:** Replace the placeholder handlers in `pizzaz_server_node/src` with real API calls. For example, fetch live restaurant data based on `pizzaTopping` or user’s location.
- **Build new tools:** Define additional tools in MCP for other features (e.g. an “order pizza” action, or a “suggest restaurants” tool). Each can have its own UI.
- **Create custom widgets:** Design your own React/HTML components and add them to the `src/` gallery. The build system will bundle them to `assets/` automatically.
- **Integrate Auth or Persistence:** Use Apps SDK’s support for OAuth 2.0 if you need user-specific data or login. Add state persistence (e.g. save favorites) by connecting a database.
- **Potential use cases:** Think beyond pizza! The same pattern works for any domain. For example, a travel planner could use a map widget for attractions, a list for itineraries, and tools to fetch flight/hotel info. A finance assistant might use graphs or tables as widgets.
- **Follow design guidelines:** Ensure your conversational flows feel natural in ChatGPT and follow the [official guidelines](https://platform.openai.com/docs/apps/guidelines) for UX and safety. Rich metadata (titles, descriptions) helps ChatGPT know when to launch your tool.
The key takeaway is that the OpenAI Apps SDK (with MCP) lets you **build AI apps with OpenAI** by defining tools + components. The Pizzaz Node example is a tutorial scaffold – use it as a template. Experiment with it, read the comments in the code, and adapt the architecture to your needs. For more details, refer to OpenAI’s documentation and the Apps SDK examples. Happy building!
**Sources:** The above tutorial references the official OpenAI Apps SDK and MCP documentation and examples. The Pizzaz example is from the OpenAI [Apps SDK Examples GitHub](https://github.com/openai/openai-apps-sdk-examples) repository. The embedded screenshots are from OpenAI’s Apps SDK docs.
---
# Integrating Next.js with OpenAI Apps: A Comprehensive Guide
Guide on integrating OpenAI Apps into a Next.js app. We cover how to set up an MCP server, define tools, and bundle React components for use as widgets.
**OpenAI Apps** turn ChatGPT into an “app platform” where third-party services can run inside conversations. Built on the open **Model Context Protocol (MCP)**, these apps let you combine chatbot prompts with rich, interactive UIs (widgets) powered by your own code. MCP is *“an open specification for connecting large language model clients to external tools, data, and user interfaces”*. In practice, this means you run an MCP server (in Node, Python, etc.) that advertises *tools* the model can call. Each tool can return structured data plus HTML/JS for a React component, and ChatGPT will automatically render that UI inline.
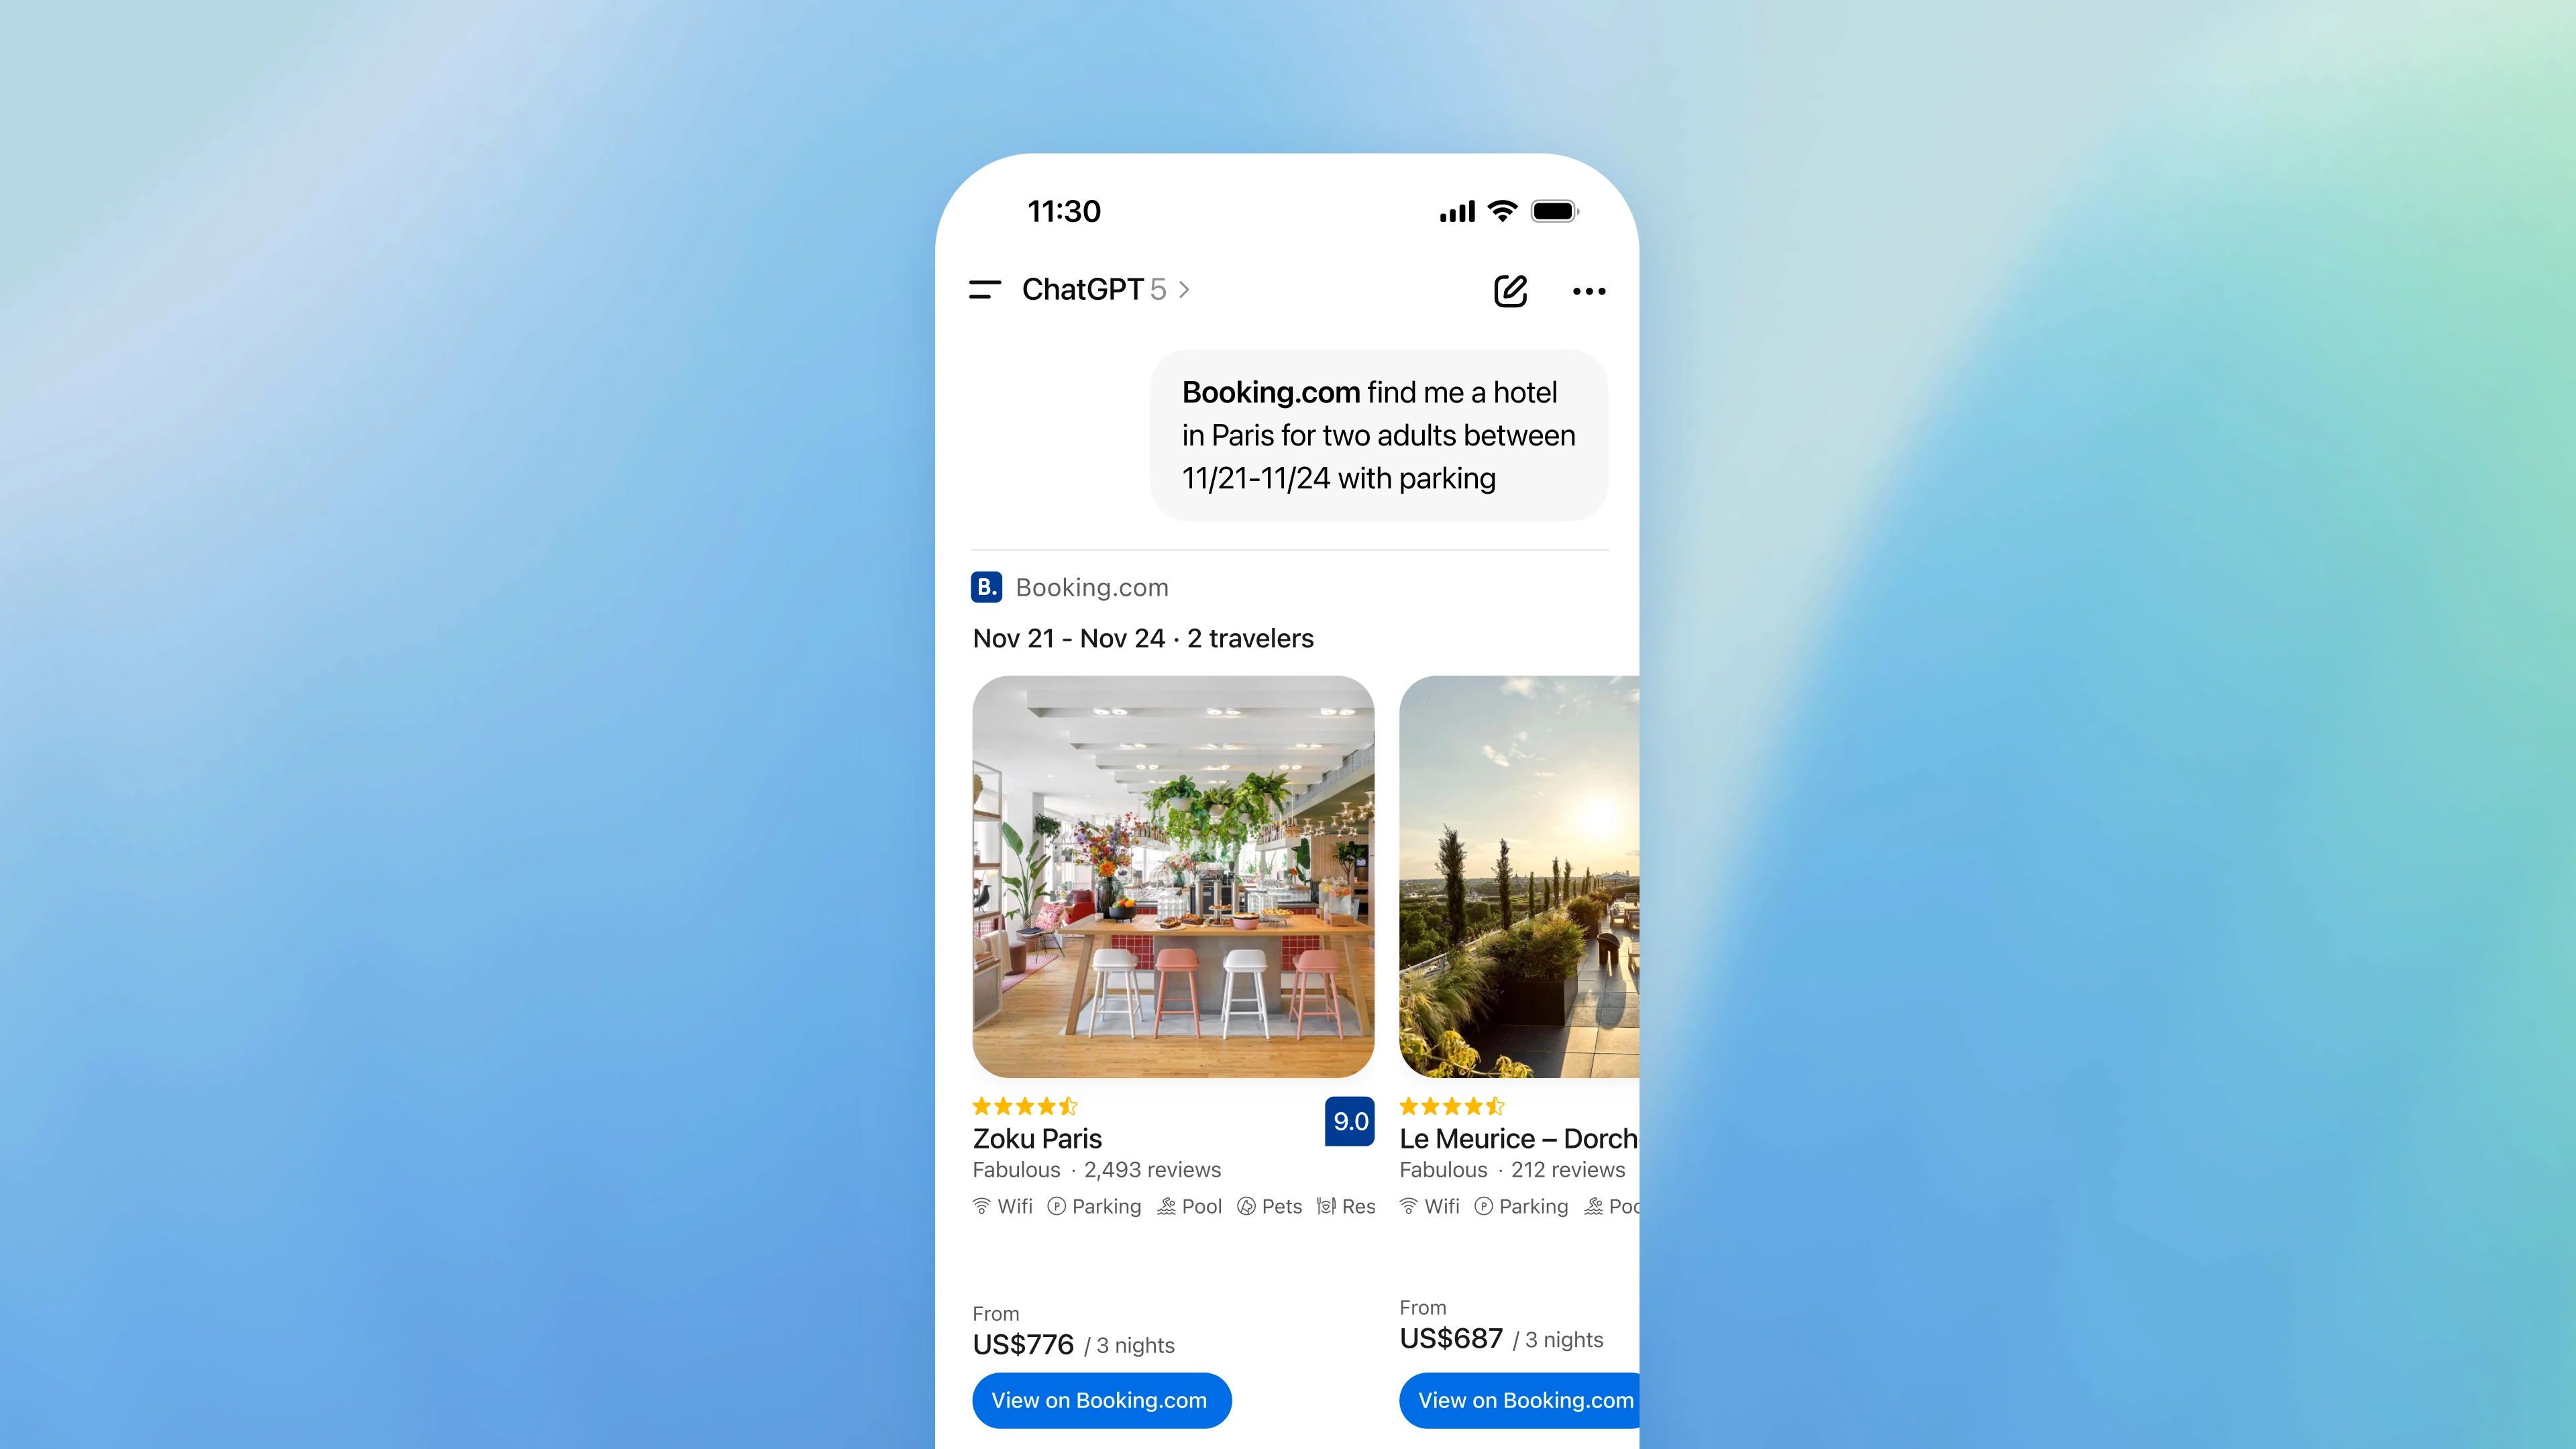 *Figure: ChatGPT conversation with an integrated Booking.com App (hotel search). OpenAI Apps blend chat and interactive UI: the model calls the Booking.com tool and displays hotel listings directly inside ChatGPT’s interface.*
Below we explain the concepts of OpenAI Apps and MCP, then walk through integrating them into a Next.js app. We cover how to **set up an MCP server**, **define tools**, and **bundle React components** for use as widgets. We include sample code, architecture tips, and best practices.
## What Are OpenAI Apps and MCP?
**OpenAI Apps** are interactive tools that run *inside* ChatGPT conversations. Users can invoke an app by name or let ChatGPT suggest it when relevant (e.g. using a Zillow app for real estate or a Spotify app for playlists). Each app responds to natural-language queries and can include a fully custom UI (maps, charts, etc.) that appears right in the chat.
The **Apps SDK** is the framework OpenAI provides to build these apps. It’s built on MCP – an open standard that makes LLMs connect to external tools and UIs. In short, MCP is like a “USB-C port” for AI apps: it standardizes how you advertise tools (name, schema, UI) and return data so ChatGPT knows what to do. As OpenAI puts it, the MCP server is *“the foundation of every Apps SDK integration”*: it **exposes tools that the model can call** and packages the structured data plus the HTML/JS of your widget. The Apps SDK uses this to “keep the server, model, and UI in sync”.
A minimal MCP integration (and thus an OpenAI App) typically does three things:
- **List tools:** Your server advertises the tools it supports, including their JSON-schema inputs/outputs. This tells ChatGPT what actions your app can perform.
- **Call tools:** When the model decides to use a tool, it sends a `call_tool` request with arguments. Your MCP server receives this, executes the action (e.g. fetch data), and returns the result.
- **Return widgets (UI):** Along with the result data, you supply an embedded widget by registering an HTML/JS resource in your MCP server. The server returns a reference (template URI) to that UI. ChatGPT then renders the widget inline in the chat, hydrating it with your structured data.
In other words, OpenAI Apps let you **“design both the logic and interface of [chat-based] applications”**. You write normal server code (Node, Express, Next.js, etc.) to handle tool calls, and you build React components (bundled to static JS/CSS) for the UI. The MCP standard takes care of routing everything through ChatGPT.
## Why Use Next.js for OpenAI Apps?
Next.js is a popular React framework for building full-stack web apps. It fits OpenAI Apps well because:
- **Universal Stack:** You can use Next.js for both the server (API routes) *and* the UI component. Your MCP server code can live in a Next.js API route or custom server, and your widget can be a React component in your app.
- **TypeScript & SDKs:** Next.js supports TypeScript, matching the official MCP SDK (`@modelcontextprotocol/sdk`) which works great in Node/React environments.
- **Build Pipeline:** Next.js has built-in bundling (with Vite or Webpack) to compile React components into static assets. You can export your widget HTML/JS from a Next.js build and serve it in the MCP server.
- **Deployment:** You can deploy to Vercel or any Node host with HTTPS, which ChatGPT requires. Vercel even has an MCP adapter to simplify this integration (see [this Vercel template](https://vercel.com/templates/next.js/model-context-protocol-mcp-with-next-js)).
By integrating OpenAI Apps into Next.js, you leverage familiar tools (pages, API routes, hooks) and keep everything in one project. The guidance below assumes a Next.js (Node/React) environment, but the MCP concepts apply to any stack.
## Getting Started: Prerequisites
Before building your OpenAI App, ensure you have:
- **Node.js (18+)** and npm/yarn/pnpm.
- **Next.js** (latest version) with a new or existing project.
- **TypeScript** (optional but recommended) for defining tool schemas.
- **@modelcontextprotocol/sdk:** the official MCP TypeScript SDK (install via `npm install @modelcontextprotocol/sdk`).
- (Optional) **React** 18 or 19 for building components, though Next.js includes React already.
In your Next.js project folder, install the MCP SDK:
```bash
npm install @modelcontextprotocol/sdk
```
This gives you the `McpServer` class to define your tools, and client transports to connect to MCP servers.
## Building the MCP Server
Your **MCP server** is the core of the app. It handles incoming calls from ChatGPT, executes logic, and returns data + UI. In Next.js, a common approach is to create an API route (e.g. `pages/api/mcp.ts` or using the App Router). This route will accept GET/POST from ChatGPT.
Here’s a simple example using the MCP SDK in a Next.js API route (TypeScript):
```ts
// pages/api/mcp.ts
import { McpServer } from '@modelcontextprotocol/sdk/server/mcp';
import { NextApiRequest, NextApiResponse } from 'next';
// Create the MCP server instance
const server = new McpServer({
name: 'my-nextjs-app',
version: '0.1.0'
});
// (We will register resources and tools here...)
// Export a handler that calls the MCP server on each request.
export default function handler(req: NextApiRequest, res: NextApiResponse) {
// MCP SDK provides a handler we can use directly
return server.handle(req, res);
}
```
In this snippet, `McpServer` is initialized with a name and version. You then register **resources** (UI templates) and **tools** on this server. Finally, exporting `server.handle(req, res)` wires up the MCP endpoint. ChatGPT will talk to this endpoint (e.g. https://yourdomain/api/mcp) via HTTP streaming (SSE or Long-polling).
> **Tip:** If you use Next’s App Router, you can similarly create a Route Handler under `app/api/mcp/route.ts`. The [Vercel template](https://vercel.com/templates/next.js/model-context-protocol-mcp-with-next-js) uses a helper to mount an MCP server on a route. But the principle is the same: route all requests to your `McpServer`.
### Installing and Choosing the Apps SDK
Although everything rests on MCP, you might see references to the “Apps SDK” in docs. The Apps SDK is not a separate npm package — it’s essentially ChatGPT’s integration layer that expects MCP. For the server-side, installing `@modelcontextprotocol/sdk` is sufficient. You don’t need a client-side SDK; the ChatGPT host will render your HTML+JS automatically.
OpenAI does provide a [full Apps SDK GitHub repo with examples](https://github.com/openai/openai-apps-sdk-examples). It shows widget examples and matching servers. Use these as inspiration for UI patterns.
## Defining Tools for Your App
**Tools** are the endpoints or actions your app offers. Think of each tool like an API: it has a *machine name*, a *human-friendly title*, input arguments, and output schema. When ChatGPT’s model decides to use your app, it will call one of these tools.
Using the MCP server, register tools like so:
```ts
import { z } from 'zod';
// Example: a simple "Hello World" tool
server.registerTool(
'hello-tool', // internal name of the tool
{
title: 'Say Hello', // human title
description: 'Returns a greeting from this app',
// Schema for input arguments (here none expected)
inputSchema: {},
// Metadata with the UI template we'll set up
_meta: {
'openai/outputTemplate': 'ui://widget/hello.html'
}
},
async (args) => {
// Logic for the tool: args is the parsed JSON input
return {
// Text that ChatGPT will see and read aloud, etc.
content: [{ type: 'text', text: 'Hello from my OpenAI App!' }],
// Structured data to pass to the UI widget
structuredContent: { greeting: 'Hi there!' }
};
}
);
```
Key points:
- The first argument to `registerTool` is the tool name (`hello-tool`), used internally.
- The second arg is the descriptor: `title`, `description`, and `inputSchema` (use Zod or JSON schema).
- In `_meta`, we set `"openai/outputTemplate"` to the URI of our UI (to be registered as a resource).
- The third arg is an async function that executes the tool. It returns an object with:
- `content`: optional chat text (array of text segments) shown to user by ChatGPT.
- `structuredContent`: JSON data fed to the widget’s JS.
- Optionally `_meta`: extra data only for the widget (not visible to model).
According to OpenAI, a well-defined tool integration should *“advertise its JSON Schema… so the model knows when—and how—to call each tool”*. In practice, this means your tool definitions (and their Zod schemas) help ChatGPT plan when to invoke your app.
**Example:** Let’s define a “Weather Check” tool.
```ts
server.registerTool(
'check-weather',
{
title: 'Check Weather',
description: 'Gets current weather for a city',
inputSchema: z.object({ city: z.string() }).optional(),
_meta: {
'openai/outputTemplate': 'ui://widget/weather.html'
}
},
async ({ city }) => {
// (Call a real weather API here)
const data = await fetchWeatherForCity(city);
return {
content: [{
type: 'text',
text: `Weather in ${city}: ${data.summary}, ${data.temperature}°C`
}],
structuredContent: { forecast: data.forecast }
};
}
);
```
This tool takes a city name and would, for instance, return a text summary plus structured forecast data for a UI chart. Note how `'openai/outputTemplate'` points to `ui://widget/weather.html`, which we will register next.
## Building the React UI Component
Each tool can be accompanied by a custom UI (widget). In OpenAI Apps, UI components are standard web code (HTML, JS, CSS). The ChatGPT client will embed this code in an iframe and expose some APIs via `window.openai`. Your React component runs inside that iframe.
**Project layout:** Keep server and web code separate. A common structure is:
```
/app
/server # Next.js (or Node) MCP server code (tools, resources)
/web # Frontend for widgets (React components)
/src
Widget.tsx
/dist
widget.js # built JS for widget
widget.css
```
In Next.js you can use its build process (or Vite) to bundle your React component(s). The built output will include a JS file that mounts into an HTML `div`.
In your widget source (e.g. `Widget.tsx`), you *mount into a div and read initial data from `window.openai.toolOutput`*. For example:
```tsx
import React from 'react';
import { createRoot } from 'react-dom/client';
function WeatherWidget() {
const data = (window as any).openai.toolOutput; // structuredContent from MCP
return (
*Figure: ChatGPT conversation with an integrated Booking.com App (hotel search). OpenAI Apps blend chat and interactive UI: the model calls the Booking.com tool and displays hotel listings directly inside ChatGPT’s interface.*
Below we explain the concepts of OpenAI Apps and MCP, then walk through integrating them into a Next.js app. We cover how to **set up an MCP server**, **define tools**, and **bundle React components** for use as widgets. We include sample code, architecture tips, and best practices.
## What Are OpenAI Apps and MCP?
**OpenAI Apps** are interactive tools that run *inside* ChatGPT conversations. Users can invoke an app by name or let ChatGPT suggest it when relevant (e.g. using a Zillow app for real estate or a Spotify app for playlists). Each app responds to natural-language queries and can include a fully custom UI (maps, charts, etc.) that appears right in the chat.
The **Apps SDK** is the framework OpenAI provides to build these apps. It’s built on MCP – an open standard that makes LLMs connect to external tools and UIs. In short, MCP is like a “USB-C port” for AI apps: it standardizes how you advertise tools (name, schema, UI) and return data so ChatGPT knows what to do. As OpenAI puts it, the MCP server is *“the foundation of every Apps SDK integration”*: it **exposes tools that the model can call** and packages the structured data plus the HTML/JS of your widget. The Apps SDK uses this to “keep the server, model, and UI in sync”.
A minimal MCP integration (and thus an OpenAI App) typically does three things:
- **List tools:** Your server advertises the tools it supports, including their JSON-schema inputs/outputs. This tells ChatGPT what actions your app can perform.
- **Call tools:** When the model decides to use a tool, it sends a `call_tool` request with arguments. Your MCP server receives this, executes the action (e.g. fetch data), and returns the result.
- **Return widgets (UI):** Along with the result data, you supply an embedded widget by registering an HTML/JS resource in your MCP server. The server returns a reference (template URI) to that UI. ChatGPT then renders the widget inline in the chat, hydrating it with your structured data.
In other words, OpenAI Apps let you **“design both the logic and interface of [chat-based] applications”**. You write normal server code (Node, Express, Next.js, etc.) to handle tool calls, and you build React components (bundled to static JS/CSS) for the UI. The MCP standard takes care of routing everything through ChatGPT.
## Why Use Next.js for OpenAI Apps?
Next.js is a popular React framework for building full-stack web apps. It fits OpenAI Apps well because:
- **Universal Stack:** You can use Next.js for both the server (API routes) *and* the UI component. Your MCP server code can live in a Next.js API route or custom server, and your widget can be a React component in your app.
- **TypeScript & SDKs:** Next.js supports TypeScript, matching the official MCP SDK (`@modelcontextprotocol/sdk`) which works great in Node/React environments.
- **Build Pipeline:** Next.js has built-in bundling (with Vite or Webpack) to compile React components into static assets. You can export your widget HTML/JS from a Next.js build and serve it in the MCP server.
- **Deployment:** You can deploy to Vercel or any Node host with HTTPS, which ChatGPT requires. Vercel even has an MCP adapter to simplify this integration (see [this Vercel template](https://vercel.com/templates/next.js/model-context-protocol-mcp-with-next-js)).
By integrating OpenAI Apps into Next.js, you leverage familiar tools (pages, API routes, hooks) and keep everything in one project. The guidance below assumes a Next.js (Node/React) environment, but the MCP concepts apply to any stack.
## Getting Started: Prerequisites
Before building your OpenAI App, ensure you have:
- **Node.js (18+)** and npm/yarn/pnpm.
- **Next.js** (latest version) with a new or existing project.
- **TypeScript** (optional but recommended) for defining tool schemas.
- **@modelcontextprotocol/sdk:** the official MCP TypeScript SDK (install via `npm install @modelcontextprotocol/sdk`).
- (Optional) **React** 18 or 19 for building components, though Next.js includes React already.
In your Next.js project folder, install the MCP SDK:
```bash
npm install @modelcontextprotocol/sdk
```
This gives you the `McpServer` class to define your tools, and client transports to connect to MCP servers.
## Building the MCP Server
Your **MCP server** is the core of the app. It handles incoming calls from ChatGPT, executes logic, and returns data + UI. In Next.js, a common approach is to create an API route (e.g. `pages/api/mcp.ts` or using the App Router). This route will accept GET/POST from ChatGPT.
Here’s a simple example using the MCP SDK in a Next.js API route (TypeScript):
```ts
// pages/api/mcp.ts
import { McpServer } from '@modelcontextprotocol/sdk/server/mcp';
import { NextApiRequest, NextApiResponse } from 'next';
// Create the MCP server instance
const server = new McpServer({
name: 'my-nextjs-app',
version: '0.1.0'
});
// (We will register resources and tools here...)
// Export a handler that calls the MCP server on each request.
export default function handler(req: NextApiRequest, res: NextApiResponse) {
// MCP SDK provides a handler we can use directly
return server.handle(req, res);
}
```
In this snippet, `McpServer` is initialized with a name and version. You then register **resources** (UI templates) and **tools** on this server. Finally, exporting `server.handle(req, res)` wires up the MCP endpoint. ChatGPT will talk to this endpoint (e.g. https://yourdomain/api/mcp) via HTTP streaming (SSE or Long-polling).
> **Tip:** If you use Next’s App Router, you can similarly create a Route Handler under `app/api/mcp/route.ts`. The [Vercel template](https://vercel.com/templates/next.js/model-context-protocol-mcp-with-next-js) uses a helper to mount an MCP server on a route. But the principle is the same: route all requests to your `McpServer`.
### Installing and Choosing the Apps SDK
Although everything rests on MCP, you might see references to the “Apps SDK” in docs. The Apps SDK is not a separate npm package — it’s essentially ChatGPT’s integration layer that expects MCP. For the server-side, installing `@modelcontextprotocol/sdk` is sufficient. You don’t need a client-side SDK; the ChatGPT host will render your HTML+JS automatically.
OpenAI does provide a [full Apps SDK GitHub repo with examples](https://github.com/openai/openai-apps-sdk-examples). It shows widget examples and matching servers. Use these as inspiration for UI patterns.
## Defining Tools for Your App
**Tools** are the endpoints or actions your app offers. Think of each tool like an API: it has a *machine name*, a *human-friendly title*, input arguments, and output schema. When ChatGPT’s model decides to use your app, it will call one of these tools.
Using the MCP server, register tools like so:
```ts
import { z } from 'zod';
// Example: a simple "Hello World" tool
server.registerTool(
'hello-tool', // internal name of the tool
{
title: 'Say Hello', // human title
description: 'Returns a greeting from this app',
// Schema for input arguments (here none expected)
inputSchema: {},
// Metadata with the UI template we'll set up
_meta: {
'openai/outputTemplate': 'ui://widget/hello.html'
}
},
async (args) => {
// Logic for the tool: args is the parsed JSON input
return {
// Text that ChatGPT will see and read aloud, etc.
content: [{ type: 'text', text: 'Hello from my OpenAI App!' }],
// Structured data to pass to the UI widget
structuredContent: { greeting: 'Hi there!' }
};
}
);
```
Key points:
- The first argument to `registerTool` is the tool name (`hello-tool`), used internally.
- The second arg is the descriptor: `title`, `description`, and `inputSchema` (use Zod or JSON schema).
- In `_meta`, we set `"openai/outputTemplate"` to the URI of our UI (to be registered as a resource).
- The third arg is an async function that executes the tool. It returns an object with:
- `content`: optional chat text (array of text segments) shown to user by ChatGPT.
- `structuredContent`: JSON data fed to the widget’s JS.
- Optionally `_meta`: extra data only for the widget (not visible to model).
According to OpenAI, a well-defined tool integration should *“advertise its JSON Schema… so the model knows when—and how—to call each tool”*. In practice, this means your tool definitions (and their Zod schemas) help ChatGPT plan when to invoke your app.
**Example:** Let’s define a “Weather Check” tool.
```ts
server.registerTool(
'check-weather',
{
title: 'Check Weather',
description: 'Gets current weather for a city',
inputSchema: z.object({ city: z.string() }).optional(),
_meta: {
'openai/outputTemplate': 'ui://widget/weather.html'
}
},
async ({ city }) => {
// (Call a real weather API here)
const data = await fetchWeatherForCity(city);
return {
content: [{
type: 'text',
text: `Weather in ${city}: ${data.summary}, ${data.temperature}°C`
}],
structuredContent: { forecast: data.forecast }
};
}
);
```
This tool takes a city name and would, for instance, return a text summary plus structured forecast data for a UI chart. Note how `'openai/outputTemplate'` points to `ui://widget/weather.html`, which we will register next.
## Building the React UI Component
Each tool can be accompanied by a custom UI (widget). In OpenAI Apps, UI components are standard web code (HTML, JS, CSS). The ChatGPT client will embed this code in an iframe and expose some APIs via `window.openai`. Your React component runs inside that iframe.
**Project layout:** Keep server and web code separate. A common structure is:
```
/app
/server # Next.js (or Node) MCP server code (tools, resources)
/web # Frontend for widgets (React components)
/src
Widget.tsx
/dist
widget.js # built JS for widget
widget.css
```
In Next.js you can use its build process (or Vite) to bundle your React component(s). The built output will include a JS file that mounts into an HTML `div`.
In your widget source (e.g. `Widget.tsx`), you *mount into a div and read initial data from `window.openai.toolOutput`*. For example:
```tsx
import React from 'react';
import { createRoot } from 'react-dom/client';
function WeatherWidget() {
const data = (window as any).openai.toolOutput; // structuredContent from MCP
return (
Forecast
{data.forecast.summary}
{/* more rendering... */}` and script, then returns `structuredContent` with tasks to be rendered by the widget.
In summary, to inject React components:
1. **Register a HTML+JS resource** in your MCP server (`registerResource`) with a unique `uri` like `ui://widget/mycomponent.html`.
2. **Reference that URI in your tool’s `_meta.openai/outputTemplate`**.
3. **Return structuredContent from the tool**; the Apps SDK will hydrate your widget with that data.
4. **Mount your React component** into a root div in the HTML. Use `window.openai.toolOutput` inside your code to get the data.
## Testing and Deployment
To test locally, run your Next.js app (port 3000 by default). The MCP endpoint (e.g. `http://localhost:3000/api/mcp`) needs to be accessible via **HTTPS** to ChatGPT. During development, use a tunnel like **ngrok**:
```bash
ngrok http 3000
# Suppose it gives https://xyz123.ngrok.app
```
Then in ChatGPT Developer Mode, create a new *ChatGPT integration* (Connector) pointing to your server URL (e.g. `https://xyz123.ngrok.app/api/mcp`). ChatGPT will fetch your tool list (`List tools` operation) and let you call them. You can also try the [MCP Inspector](https://modelcontextprotocol.io) as an in-browser tester: point it at your `/mcp` endpoint and invoke tools manually.
For production, deploy to an HTTPS environment. Vercel (Next.js) or any cloud VM with a certificate works. Make sure your MCP endpoint is fast to avoid timeouts in ChatGPT. See OpenAI’s [Deploy your app](https://developers.openai.com/apps-sdk/deploy) docs for more.
## Sample Architecture
A simple architecture for a Next.js-based OpenAI App might look like:
- **Next.js server**
- **API route `/api/mcp`** runs an `McpServer`.
- Tools and Resources are registered here (using `@modelcontextprotocol/sdk`).
- Calls to external APIs (e.g. databases, other services) happen here.
- **React widget code**
- Lives in `components/` or a separate `web/` directory.
- Built into static files (JS/CSS) and served by the MCP server via `registerResource`.
- Communicates via `window.openai` APIs inside the iframe (e.g. `toolOutput`, `callTool`, `sendFollowupTurn`).
- **ChatGPT client**
- When user invokes an app, it calls the MCP server for data and widget code.
- Renders chat text and the iframe with your component.
```plaintext
[User ChatGPT] --calls--> [OpenAI ChatGPT Model]
--makes API calls--> [Your MCP Server @ Next.js]
--serves UI resources-->
<--structured content, HTML--
UI rendered in ChatGPT <-- widget JS/CSS --
```
## Use Cases and Best Practices
**Use Cases:** OpenAI Apps can serve many scenarios. For example, you might build:
- A **travel planner** app: integrate Booking.com or Expedia, let users search hotels/flights with interactive calendars and maps.
- A **data visualization** app: plug into a database or API, show charts or dashboards inline.
- A **productivity tool**: e.g. a Kanban board, to-do list, or timeline inside chat.
- A **shopping assistant**: browse products from a store’s catalog with clickable images.
- **Financial tools**: stock quote lookup, calculator, or personal finance manager.
- **Educational aids**: language practice, math solvers with step-by-step UI.
Essentially, any service that benefits from conversational UI *plus* a visual interface can be an OpenAI App.
**Best Practices:**
- **Design for conversation:** Your app should fit seamlessly in chat. Provide text responses (`content`) along with your UI. Don’t overwhelm with UI; let the model also summarize key info.
- **Efficient structuredContent:** Only send data the UI needs. ChatGPT can see `structuredContent`, so don’t include sensitive info there. Use `_meta` for hidden data.
- **Version your UI:** ChatGPT aggressively caches widget URIs. When you update your JS/CSS, bump the resource URI (e.g. add a version in the name) to avoid stale content.
- **Security (CSP):** Widgets run in iframes with strict CSP. Define a content security policy (using `openai/widget` meta) so ChatGPT can inspect it. Allow only necessary sources/scripts.
- **Authentication:** If your app has user-specific data, implement auth (OAuth 2.0, JWT, etc.). The Apps SDK guides have sections on adding user identity. ChatGPT handles initial “connect” prompts.
- **Widget accessible:** If your widget needs to *call tools on its own* (e.g. user clicks a button to do something), set `_meta.openai.widgetAccessible: true` on those tools.
- **Optimize performance:** Keep payloads small and code lean. Large widgets or slow APIs can make the chat lag. The docs recommend keeping dependency bundles small.
- **Follow design guidelines:** OpenAI’s [developer guidelines](https://developers.openai.com/apps-sdk/design) outline quality and safety standards. Provide clear UX, handle errors, and follow usage policies.
By following these practices and leveraging MCP, your Next.js app can become a fully interactive OpenAI App. Developers have already done similar integrations (see [OpenAI’s example repo](https://github.com/openai/openai-apps-sdk-examples) and the Vercel MCP template).
## Conclusion
Integrating Next.js with OpenAI Apps involves running an MCP server in your Next.js backend and building React widgets for the front-end. The steps are:
1. **Set up an MCP server** (e.g. a Next.js API route) using `@modelcontextprotocol/sdk`.
2. **Define tools** with names, schemas, and link each to a UI template via `_meta["openai/outputTemplate"]`.
3. **Build React components** for your widgets, bundle them, and register the resulting HTML/JS in the MCP server.
4. **Return structured data** from tools so ChatGPT can hydrate the widgets.
5. **Test via Developer Mode** (using ngrok or a live URL) and then deploy to production with HTTPS.
This guide has covered the core concepts of **OpenAI Apps**, **MCP**, and how to wire them into a **Next.js** project. As OpenAI notes, the Apps SDK “extends MCP so developers can design both the logic and interface of their apps”. By following the steps above, you can create rich chat applications that run inside ChatGPT, leveraging the best of conversational AI and web UIs.
**References:** This guide draws on OpenAI’s official docs and community resources. See OpenAI’s [Apps SDK documentation](https://developers.openai.com/apps-sdk/), the [openai-apps-sdk-examples](https://github.com/openai/openai-apps-sdk-examples) repo, and recent announcements for more details.
---